Monday, February 29, 2016

Tutorial Easter Fabric Basket


Hello Friends,
I have a free tutorial at We All Sew by BERNINA for an Easter Basket. Isn't it darling.

Check it out.
Sandra

Sunday, February 28, 2016

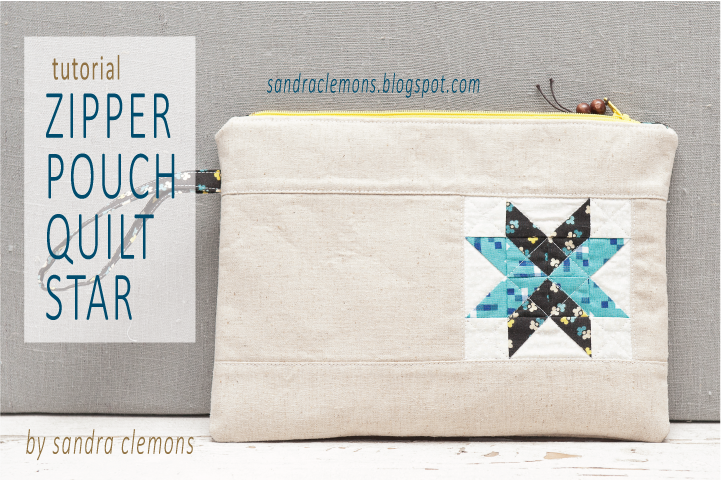
Tutorial Zipper Pouch Quilt Star

 
Hello. To celebrate my new book, Scrap Patchwork, I've put together a series of zipper pouches. 

But first, let put my own plug on this wonderful book. It’s a DIY book on making organized scrappy quilts. I talk about color and organizing your stash. You’ve gotta check it out. Most of the quilt patterns comes with alternate layouts and sizes, providing you with more possibilities. You’re going to love it.
 
https://www.etsy.com/listing/267884263/scrap-patchwork-book?ref=shop_home_active_3
 
Finished Size 8” x 11”

Materials:
1/2 yard interfacing
Fat quarter fabric for exterior (linen)
1/2 yard fabric for interior, block, zipper end covers, and strap (navy)
Fat quarter fabric for white (block)
5” x 5” square fabric for blue (block)
9” zipper
General quilting and sewing supplies
 

Cutting:
Note: I used a Pellon 809 interfacing for both the interior and exterior. I wanted my pouches stiff. Though, you don’t have to have it as stiff as mine. To soften the bag, only apply interfacing to the exterior fabric. It’s your choice.

Interfacing
     4 – 8” x 11”

Exterior fabric (linen)
     1 – 8 1/2” x 11 1/2” (back)
     2 – 2 1/2” x 11 1/2” (front)
     1 – 1 1/2” x 4 1/2” (front)
     1 – 4 1/2” x 6 1/2” (front)

Interior fabric, block, zipper end covers, and strap (navy)
     2 - 8 1/2” x 11 1/2” (interior)
     4 – 1 7/8” x 1 7/8”; cut diagonally once
     2 – 1 1/2” x 2 1/2” (zipper end covers)
     1 – 2” x 14 1/2” (optional strap)

White (block)
     4 – 1 1/2” x 1 1/2”
     1 – 3 1/4” x 3 1/4”; cut diagonally twice

Blue (block)
     4 – 1 7/8” x 1 7/8”; cut diagonally once


(Here are all the pieces for the front exterior of the pouch.)

Sew with 1/4” seam allowance.
 

Make the Block:
Finishes 4” x 4”

1.       Stitch together a blue and navy triangle together to make a half square triangle. Make 4. Press two seams towards the blue and the other two towards the navy.

2.       Take two half square triangles to stitch together. Make 2. Note in the picture the direction of the unit’s diagonal and seam.


3.       Join the two units from above to make a pinwheel unit. Pinwheel the seams.


4.       Make 4 flying geese units by stitching together two navy triangle to the white triangle, and two blue triangles to the white triangle. Make a total of 4; 2 navy and 2 blue. Press seam allowances away from the white. Clip dog ears.
 
 
5.       Join two white squares to each end of the navy flying geese units to make the top and bottom units. Make 2 and press seams towards the white squares.
 

6.       Stitch together two blue flying geese units to each end of the pinwheel to make the center unit. Match the sides to the blue. Press seams towards the pinwheel unit.
 

7.       To complete the star block, stitch together the top and bottom units to the center unit. Press seams towards the top and bottom units.

 
8.       Join the 4 1/2” x 6 1/2” linen to the left and the 1 1/2” x 4 1/2” to the right of the star block. Press seams towards the linen.
 

9.       Stitch the 2 1/2” x 11 1/2” linen to the top and bottom to make the exterior front cover. This measures 8 1/2” x 11 1/2”.


Make the Strap:
Choose to iron on fusible interfacing on the wrong side of the handle. I did for my Zipper Pouch Square-in-a-Square. However it was so stiff, I had to place the end next to each other, instead of on top of each other. For this pouch, I left the interfacing off and I like the soften feel of it.  Click here to see how to make a strap.


Prep the Zipper and Make the Bag:
1.      Refer to the Zipper Pouch Square-in-a-Square to prep to the zipper.

2.       Iron on interfacing to front and back exterior, and front and back interior units. Center the interfacing to the wrong side of the fabrics. The interfacing is 1/4” short on all four sides. This is intended to reduce seam bulk.

3.       Feel free to machine quilt the units as desired.


4.     Refer to the Zipper Pouch Square-in-a-Square to make the pouch.
 

Add the Zipper Tassel:
Click here to see how to make a zipper tassel for your pouch.

There you have it. There are other version of this bag to check out over on my blog. Now that you have all the ingredients to make your very own pouch, it’s your turn to make it blossom.
 
Enjoy!
Sandra

Sunday, February 21, 2016

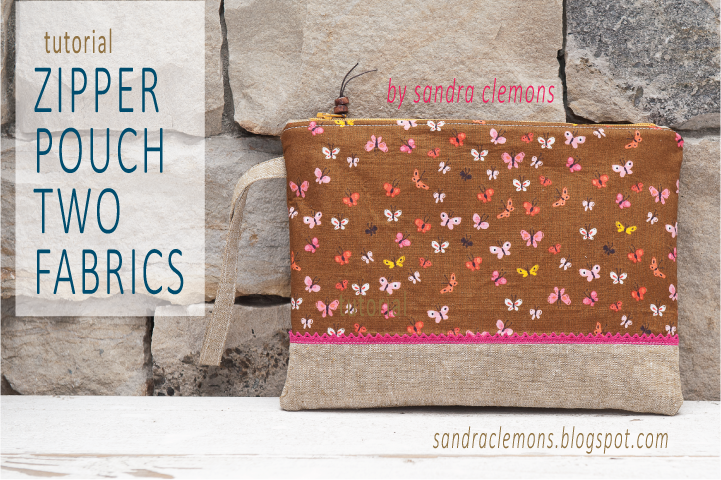
Tutorial Zipper Pouch Two Fabrics

 
Hello. To celebrate my new book, Scrap Patchwork, I've put together a series of zipper pouches. 

But first, let put my own plug on this wonderful book. It’s a DIY book on making organized scrappy quilts. I talk about color and organizing your stash. You’ve gotta check it out. Most of the quilt patterns comes with alternate layouts and sizes, providing you with more possibilities. You’re going to love it.
 
https://www.etsy.com/listing/267884263/scrap-patchwork-book?ref=shop_home_active_3
 
Finished Size 8” x 11”
 
Materials:
1/2 yard of interfacing
Fat quarter of exterior print
Fat quarter of exterior linen
Fat quarter of interior, straps, and zipper end covers
Fat quarter of lace
9” zipper
25” of trim
General quilting and sewing supplies
 
Cutting:
Note: I used a Pellon 809 interfacing for both the interior and exterior. I wanted my pouches stiff. Though, you don’t have to have it as stiff as mine. To soften the bag, only apply interfacing to the exterior fabric. It’s your choice.
 
Interfacing
     4 – 8” x 11”
 
Exterior print
     2 – 6 1/2” x 11 1/2”
 
Exterior linen:
     2 – 2 1/2” x 11 1/2”
 
Interior fabric, strap, and zipper end covers
     2 – 8 1/2” x 11 1/2”
     1 – 2” x 14 1/2” (optional strap)
     2 – 1 1/2” x 2 1/2” (zipper end covers)
 
Sew with 1/4” seam allowance.
 
 
Make the Strap:
Choose to iron on fusible interfacing on the wrong side of the handle. I did for my Zipper Pouch Square-in-a-Square. However it was so stiff, I had to place the end next to each other, instead of on top of each other. For this pouch, I left the interfacing off and I like the soften feel of it.  Click here to see how to make a strap.
 
 
Prep the Zipper and Make the Bag:
1.      Refer to the Zipper Pouch Square-in-a-Square to prep to the zipper.
 
2.      Stitch together the exterior print and linen together along the length 11 1/2”. Press seam allowance towards the linen fabric. Edge stitch along the seams. Make 2.
 
3.      Add trim along the seam line for both exterior units.
 
  
3.     Iron on interfacing to front and back exterior, and front and back interior units. Center the interfacing to the wrong side of the fabrics. The interfacing is 1/4” short on all four sides. This is intended to reduce seam bulk.
4.     Refer to the Zipper Pouch Square-in-a-Square to make the pouch.
 
 
Add the Zipper Tassel:
Click here to see how to make a zipper tassel for your pouch.
 
 
There you have it. There are other version of this bag to check out over on my blog. Now that you have all the ingredients to make your very own pouch, it’s your turn to make it blossom.
 
Enjoy!
Sandra

Thursday, February 18, 2016

Scrap Patchwork Book

https://www.etsy.com/shop/makeitblossom?ref=hdr_shop_menu

Friends,
This week my quilt book, Scrap Patchwork, was released. It was 2 years in the making and I'm thrilled to finally share it with all of you.

First, let me plug my sponsors. Without them, my book would not be possible.

All thread by Aurifil
All batting by the Warm Company
Fabrics by Michael Miller, Moda, Art Gallery, Free Spirit, Riley Blake, Dear Stella, and RJR.

 
The Formal Book Description:
Sew 13 scrappy quilts with color palettes so sophisticated, you won’t believe they’re from scraps! Blending the best of modern and traditional quilting, these projects pair fresh fabrics with classic block designs and trusted techniques. Learn to organize your fabric and choose winning color combinations. Each quilt features design notes to help you get the look you want when “shopping” your own stash. Ideal for confident beginners, these patterns will keep your waste to a minimum and your creativity to a maximum.

• 13 scrap quilts that blend the best of modern fabrics and traditional block construction
• Organize your scraps! Tips for stash storage and designing with color
• Graphic, sophisticated quilts for the confident beginner


My Add-on Description:
Yes, there are 13 quilt patterns, but also, each pattern includes an alternate color and/or size options, providing you with more variety. In addition, there are 2 sew projects, one project to organize your stash and the other a quick little project to use up those scrappy strings.

This book comes with a specific techniques chapter. There are photos to illustrate step-by-step to make an inset seam, flying geese, and so much more. There's another chapter on color. You'll read my thoughts on color and how color translates to quilt designs. You're going to love it.

 
Where to Buy:
There are many places to buy. The local quilt shops are getting them in. If your favorite shop doesn't have it, then kindly encourage them to get a copy. It's online at various big box book stores. Or buy from me.

This book is truly a treasure to add to your collection. It is full of inspiration, techniques, and so much information. Get it now.

Sandra

Monday, February 15, 2016

Tutorial Make Straps


Hello. Today, let's discuss how to make straps for zipper pouches. You can make your strap as wide as you'd like. Keep in mind in these direction, we are making our straps 1/2" wide. To begin:

Cut 1 straps 2" x 14 1/2" (or refer back instructions).

Choose to iron on fusible interfacing on the wrong side of the handle. I did for my Zipper Pouch Square-in-a-Square. However it was so stiff, I had to place the ends next to each other, instead of on top of each other. For my other pouches, I left the interfacing off and I like the soften feel of it.

Fold the strip of fabric in half lengthwise with wrong sides together and press along the fold to make a crease. Each half is 1”.


Open up the strip. Press each end into the fold, wrong sides together, to the center crease made in the previous step. It should fold 1/2”.


Refold the strip with the ends tucked in. The strap’s width is 1/2”.


Edge stitch along the length of both sides.


Now that you have all the ingredients to make your a strap, it’s your turn to make it blossom.

Enjoy!
Sandra
Related Posts Plugin for WordPress, Blogger...