Sunday, July 26, 2015

Summer Sampler Quilt Along - Block 8 Giveaway


Friends,

The Lemoyne Block's giveaway is a Fat Quarter Bundle by RJR's Cotton Supreme Solids. This giveaway is for week 8 of the Summer Day & Night Quilt Sampler.


Check out this link for the free instructions to construct the Lemoyne Block.
 
The Prize
A huge thank you to RJR for allowing me to giveaway a fat quarter bundle of their Cotton Supreme Solids. The bundle consists of 6 fat quarters.
 
 
How to Enter 
To be in the draw, please leave a comment on this blog post or the Lemoyne Block post, or like me on my facebook page. Then, email me through my Contact Me on the right sideboard of my blog. The drawing is open all week, starting now and concluding August 2nd at noon. The winner will be announced by August 3rd, when the last block is announced.


Winner
The winner of Week 7 is Claire. Congratulations! Thanks to all who entered.
Sandra

Summer Sampler Quilt Along - Block 8

 
Hello Friends,
 
Welcome to the 8th week of the Summer Sampler Quilt Along. This week the block is called Lemoyne Star. It finishes at 16" x 16".

 
Refer to the Summer Day & Night Quilt Sampler in the menu above for a summary of our progress.


Here we go. The block: Lemoyne Star.


Cut Block 8

Light Gray – Cut 3 squares 5 1/2” x 5 1/2”, then cut diagonally once to make 6 half square triangles. (A)

Dark Gray – Cut 3 squares 5 1/2” x 5 1/2”, then cut diagonally once to make 6 half square triangles. (B)

Navy – Use Template C to cut 4 diamonds.
 

Aqua – Use Template C to cut 4 diamonds.
 
(Print the template on paper, but make sure in your printer setup the print does not adjust the size. Cut the shape out with 'paper' scissors along the dotted line. Then, lay the template on top of the fabric, and use your acrylic ruler to cut the shape out. Place the 1/4" line on your ruler to the solid line on the template, this will give you an accurate cut, then if you were to line the ruler edge to the dotted line. Don't lift your ruler until all sides are cut, simply rotate the ruler.)          


Assemble Block 8
1.      Stitch together the aqua and navy diamonds together. Make 4 and do not press yet.


2.      Make an inset seam with a light gray triangle (A) to the unit made in Step 1. Make 2. Press seams as desired.


3.    Make an inset seam with a dark gray triangle (B) to the unit made in Step 1. Make 2. Press seams as desired.


4.      Referring to the diagram below, stitch together 2 light gray triangles (A) to the units made in Step 2. Make 2.


5.      Referring to the diagram below, stitch together 2 dark gray triangles (D) to the units made in Step 3. Make 2.


6.      Stitch together the block with the units made in Step 4 and 5. Check out How to Pinwheel your Seams.


Here's mine in RJR's Cotton Supreme Solids and some assembly tips.

I did choose to pinwheel the seams for each unit made for Step 2 and 3.

This is how it Step 2 looks from the front.

And Step 3.

Here's Step 4.
 
And Step 5.

Here's the block from the back. Notice the seams.
 
Tada. The block. One more block to go!

 
Conclusion 
I hope you enjoyed the block. I'd love to see what you've come up with. Share with me through Instagram/Facebook/Pinterest.
 
Click here for your chance to win a fat quarter bundle by RJR's Cotton Supreme Solids and the winner of week 7.
 
Enjoy,

Sunday, July 19, 2015

Summer Sampler Quilt Along - Block 7


Hello Friends,
 
Welcome to the seventh week of the Summer Sampler Quilt Along. This week the block is called Kaleidoscope. It finishes at 16" x 16".

 
Refer to the Summer Day & Night Quilt Sampler in the menu above for a summary of our progress.


Here we go. The block: Kaleidoscope.


Cut Block 7

Light Gray – Use template B to cut 16 triangles.


Navy – Cut 8 squares 2 7/8” x 2 7/8” and then cut diagonally once to make 16 half square triangles. (A)


Select 4 colors, of each color:

§  Use template C to cut 4 triangles of each color.
 
(Print the template on paper, but make sure in your printer setup the print does not adjust the size. Cut the shape out with 'paper' scissors along the dotted line. Then, lay the template on top of the fabric, and use your acrylic ruler to cut the shape out. Place the 1/4" line on your ruler to the solid line on the template, this will give you an accurate cut, then if you were to line the ruler edge to the dotted line. Don't lift your ruler until all sides are cut, simply rotate the ruler.)          

Assemble Block 7

1.      Stitch together a C triangle to the right side of the B triangle. Refer to the diagram.  Make 4 of each color, resulting into 16 units.


2.      Select the 4 units of the same colors from Step 2 to stitch together. Repeat for the remaining 3 colors. Check out this link to pinwheel your seams.


3.      Stitch together 4 navy triangles (A) to each side of the unit made in Step 2. Repeat to complete 4 units.


4.      Complete the block by stitching together the units made in Step 3.


Here's mine in RJR's Cotton Supreme Solids and some assembly tips.

(My pieced cut out.)

(I chain pieced Step 1.)

(Here's Step 2. Notice the pressing and dog ears.)

(Here 2 colors of Step 2 completed.)

(I choose to pinwheel my seams. I would highly encourage it for this unit.)

(I choose to pinwheel my seams for Step 4. I would highly encourage it for this block.)
For A and B, I'm showing you how my seams locks, which is easy to achieve when you pinwheel the seams.  For C, I'm showing how I pinwheel the seams for Step 4.

(Tada. The block.)

 
Conclusion 
I hope you enjoyed the block. I'd love to see what you've come up with. Share with me through Instagram/Facebook/Pinterest.
 
Click here for your chance to win a fat quarter bundle by RJR's Cotton Supreme Solids and the winner of week 6.

Enjoy,
Sandra 

Summer Sampler Quilt Along - Block 7 Giveaway


Friends,

The Kaleidoscope Block's giveaway is a Fat Quarter Bundle by RJR's Cotton Supreme Solids. This giveaway is for week 7 of the Summer Day & Night Quilt Sampler.


Check out this link for the free instructions to construct the Kaleidoscope Block.
 
The Prize
A huge thank you to RJR for allowing me to giveaway a fat quarter bundle of their Cotton Supreme Solids. The bundle consists of 11 fat quarters.
 
 
How to Enter 
To be in the draw, please leave a comment on this blog post or the Kaleidoscope Block post, or like me on my facebook page. Then, email me through my Contact Me on the right sideboard of my blog. The drawing is open all week, starting now and concluding July 26th at noon. The winner will be announced by July 27th, when the 8th block is released.


Winner
The winner of Week 6's Wheel of Fortune Block is Kate. Congratulations! Thanks to all who entered.
Sandra

Sunday, July 12, 2015

Summer Sampler Quilt Along - Block 6 Giveaway


Friends,

The Wheel of Fortune Block's giveaway is a Fat Quarter Bundle by RJR's Cotton Supreme Solids. This giveaway is for week 6 of the Summer Day & Night Quilt Sampler.


Check out this link for the free instructions to construct the Wheel of Fortune Block.
 
The Prize
A huge thank you to RJR for allowing me to giveaway a fat quarter bundle of their Cotton Supreme Solids. The bundle consists of 10 fat quarters.


How to Enter 
To be in the draw, please leave a comment on this blog post or the Wheel of Fortune Block post, or like me on my facebook page. Then, email me through my Contact Me on the right sideboard of my blog. The drawing is open all week, starting now and concluding July 19th at noon. The winner will be announced by July 20th, when the 7th block is released.


Winner
The winner of Week 5's Four Circles Block is Kathleen. Congratulations! Thanks to all who entered.
Sandra

Sandra Clemons 


Summer Sampler Quilt Along - Block 6

  
Hello Friends,
 
Welcome to the sixth week of the Summer Sampler Quilt Along. This week the block is called Wheel of Fortune. It finishes at 16" x 16".

 
Refer to the Summer Day & Night Quilt Sampler in the menu above for a summary of our progress.


Here we go. The block: Wheel of Fortune.


Cut Block 6

Light Gray:
§  Cut 2 squares 5 7/8” x 5 7/8”, then cut diagonally once to make 4 half square triangles.(F)
§  Cut 2 squares 3 3/8” x 3 3/8”, then cut diagonally once to make 4 half square triangles.(G)
§  Cut 4 rectangles 3” x 4”. (H)
§  Cut 1 square 4“ x 4”. (I)

Blush:
§  Use Template B to cut 4 triangles.
§  Use Template D to cut 4 triangles.
§  Cut 4 squares 3 3/8” x 3 3/8”, then cut diagonally once to make 8 half square triangles. (A)

Red – Cut 8 squares 3 3/8” x 3 3/8”, then cut diagonally once to make 16 half square triangles. (C)

Navy – Cut 6 squares at 3 3/8” x 3 3/8”, then cut diagonally once to make 12 half square triangles. (E)

(Print the template on paper, but make sure in your printer setup the print does not adjust the size. Cut the shape out with 'paper' scissors along the dotted line. Then, lay the template on top of the fabric, and use your acrylic ruler to cut the shape out. Place the 1/4" line on your ruler to the solid line on the template, this will give you an accurate cut, then if you were to line the ruler edge to the dotted line. Don't lift your ruler until all sides are cut, simply rotate the ruler.)          


Assemble Block 6

1.      Stitch together an Hour-glass unit by using 1 blush (A), 2 reds (C) , and 1 navy triangles (E). Stitch together C and A, and E and A. Then, stitch together CA to EA. Make 8.

 
Or choose to pinwheel your seams.


2.      Use the unit made in Step 1 to stitch together to the gray rectangle (H). Make 2.


3.      Referring to the diagram, join the blush B and D use to each side of the unit made in Step 1. Stitch together the large gray triangle (F) and the smaller gray triangle (G) to each side of the unit. Make 4.


4.      Complete the block by stitching together the units made in Step 2 and 3. Adding a gray square (I) to the center.


Here's mine in RJR's Cotton Supreme Solids and some assembly tips.


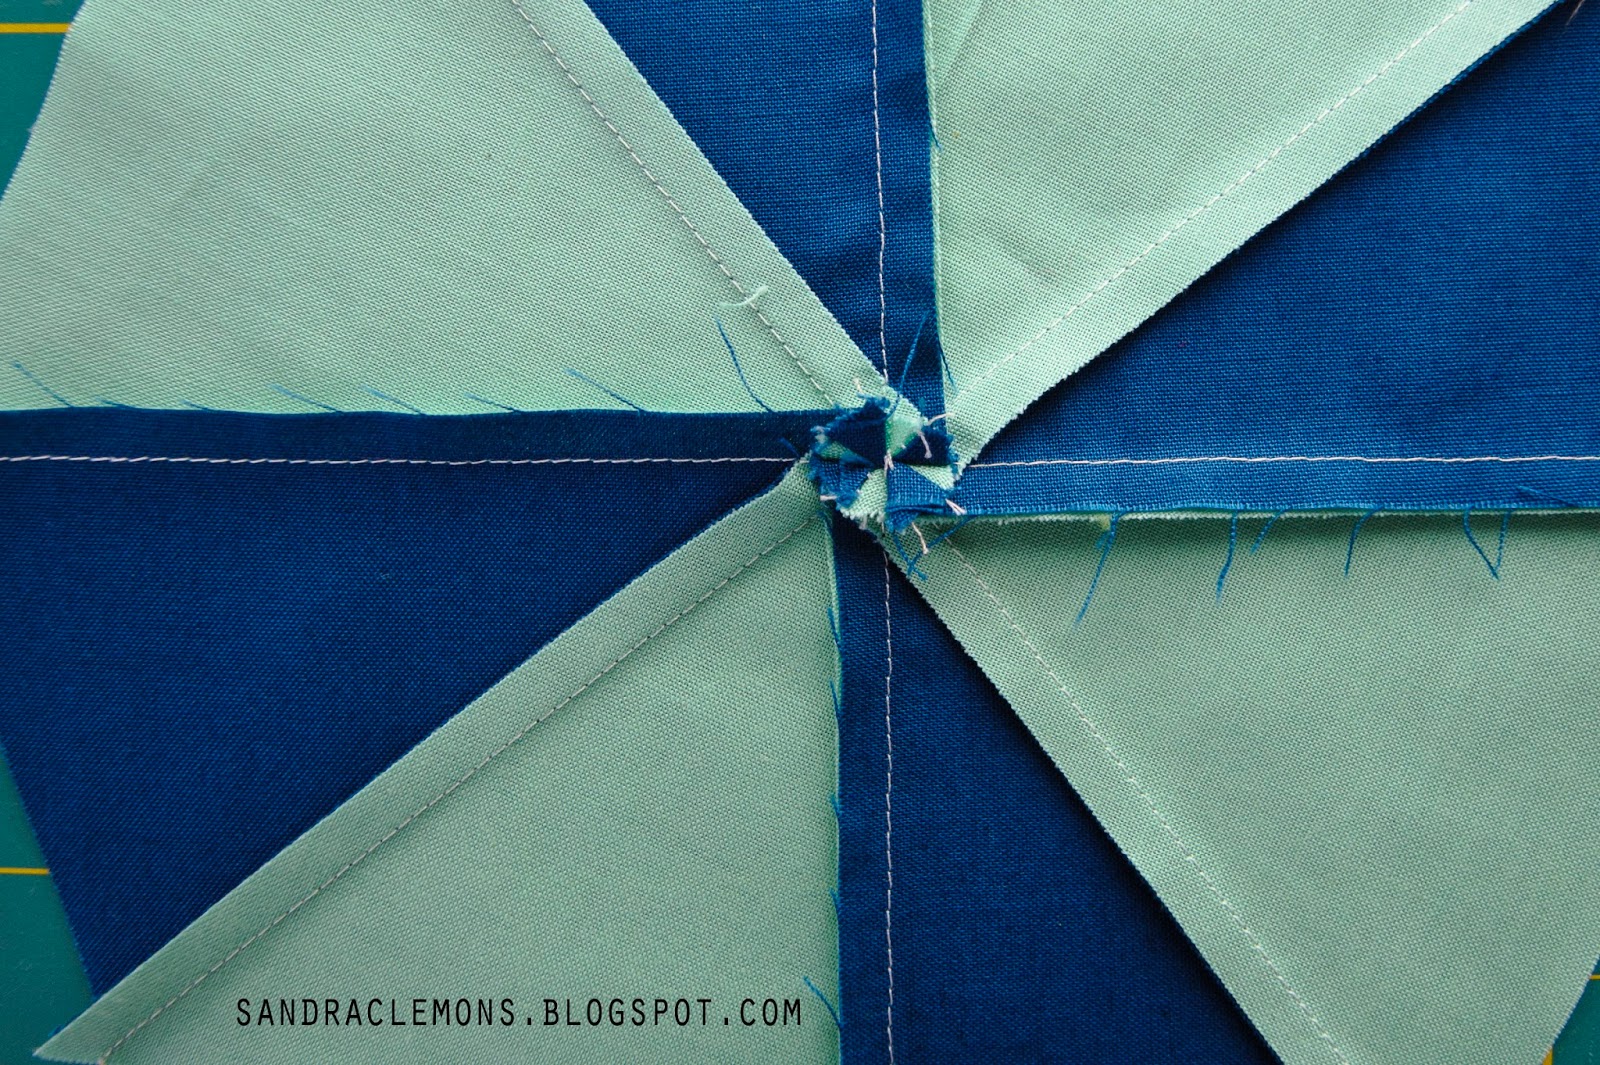
(Per Step 1 above, I choose to pinwheel my seams.)


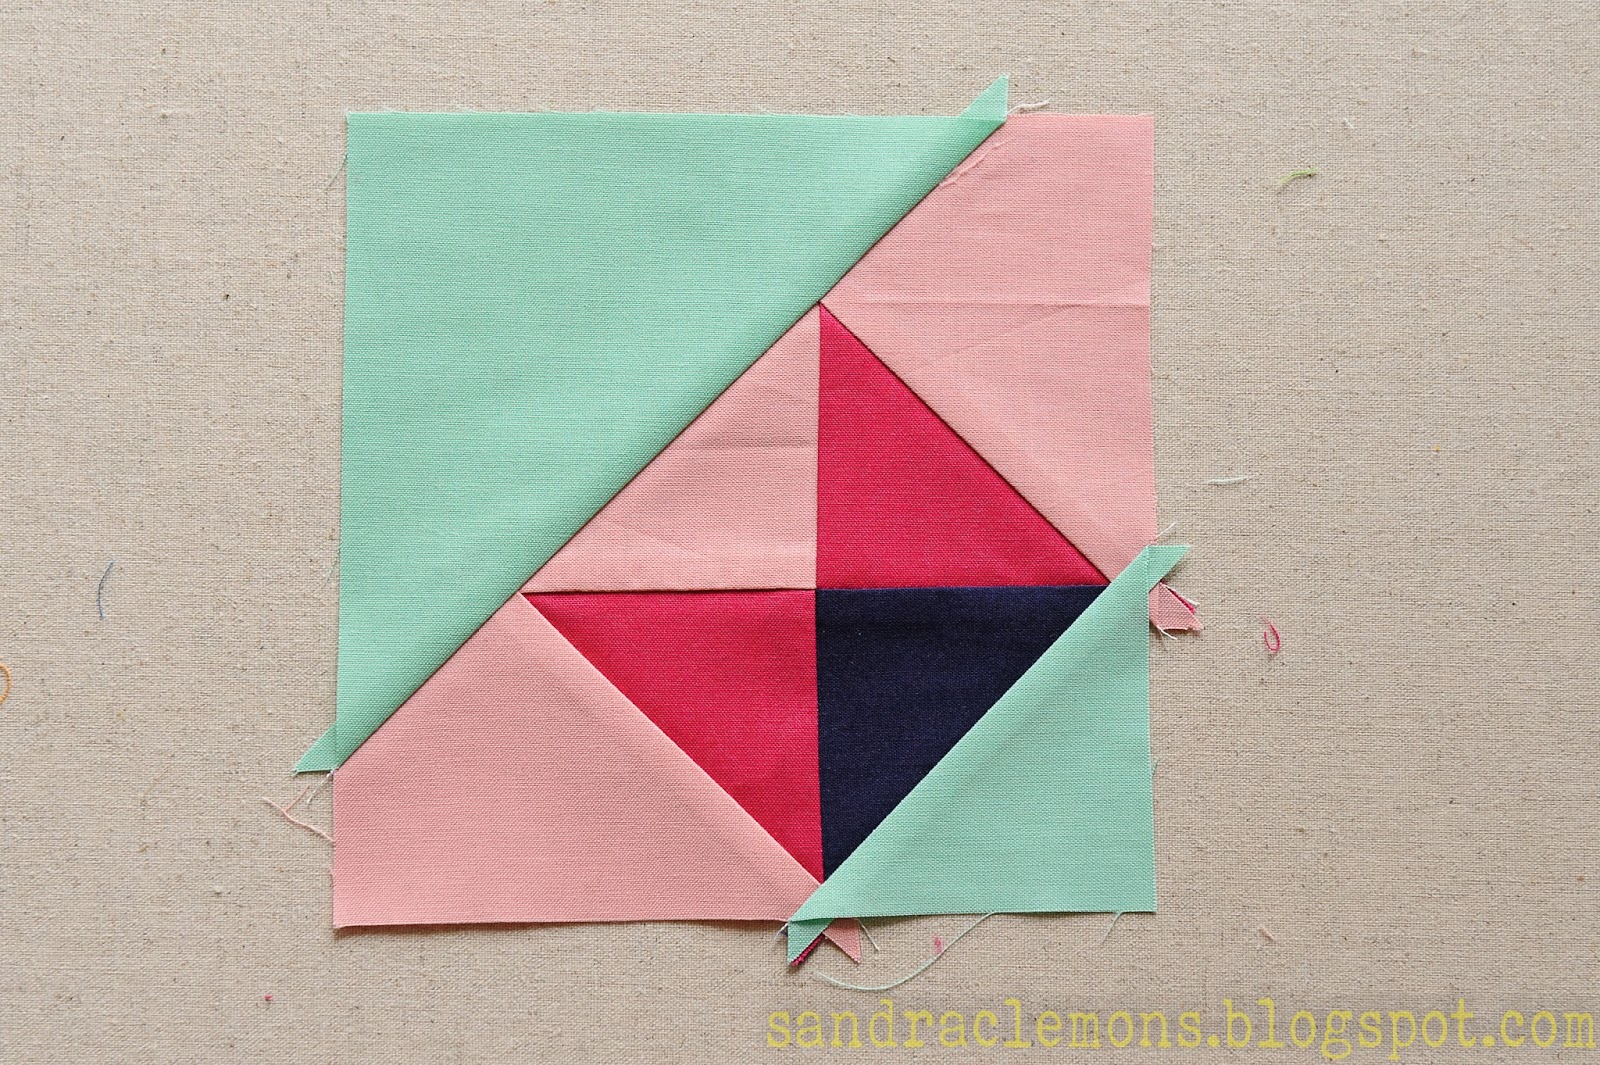
(Here is the unit from Step 1 from the front.)


(Notice the dog ears. This is for Step 3.)


(The finished unit for Step 3.)


(Dare I say it. I messed up. As I drew this block, I wanted the assembly to be easy. Perhaps, I went a little over board. Notice the center of the block. There's 9 pieces to make the center. After I cut the pieces out, I realized I could have made a center rectangle, which is the way I have instructed in this post. But it was too late. I had already cut the pieces out.)
 
 
Conclusion 
I hope you enjoyed the block. I'd love to see what you've come up with. Share with me through Instagram/Facebook/Pinterest.
 
Click here for your chance to win a fat quarter bundle by RJR's Cotton Supreme Solids and the winner of week 5.

Enjoy,
Sandra 

Related Posts Plugin for WordPress, Blogger...