Wednesday, March 30, 2016

Book Review - Creative Quilt Challenges


Friends,

Today I have something very special to share with you, a book review of Creative Quilt Challenges: Take the Challenge to Discover Your Style & Improve Your Design Skills by Pat Pease and Wendy Hill.

Wendy asked me to participate in her blog hop to promote her book and well, I jumped at the chance to meet her. She has embraced me and has become such an important friend and mentor for me in the quilt industry. I'm grateful for her words of wisdom and her tolerance of my many questions. I can't wait to meet her in person in Utah for spring quilt market.

But you all want to hear about her lovely new book...

This book will spark your creativity when you take the 7 quilt challenges in this book. Both Wendy and Pat make a quilt of each challenge, resulting in 14 quilts. Each of their quilts comes with instructions to make one of theirs or take back your freedom to make one of your very own. They provide you with so much inspiration and ideas for you to gain the confidence to develop your own quilt. This book is all about pushing your creativity to develop your own style.


Throughout the entire book, there tips and tricks, plus a techniques chapter in the back to provide you with all the necessary instruction to make your quilt with ease.


The writing, photos, and illustrations are clear and concise. What are you waiting for? Go grab yourself a copy. Available at www.ctpub.com and Amazon.

Meanwhile, if you want some more inspiration, I have a book too, called Scrap Patchwork. You can pick up both books at www.ctpub.com, Amazon, or your local quilt shop.


Make it Blossom,
Sandra

Block of the Week 22


Sunday, March 13, 2016

Tutorial Zipper Pouch Squares

 
Hello. To celebrate my new book, Scrap Patchwork, I've put together a series of zipper pouches. 

But first, let put my own plug on this wonderful book. It’s a DIY book on making organized scrappy quilts. I talk about color and organizing your stash. You’ve gotta check it out. Most of the quilt patterns comes with alternate layouts and sizes, providing you with more possibilities. You’re going to love it.

https://www.etsy.com/listing/267884263/scrap-patchwork-book?ref=shop_home_active_3

Finished Size 8” x 11”


Materials:
1/2 yard of interfacing
Fat quarter fabric for exterior and strap
Fat quarter fabric for interior and zipper end covers
Small fabric scraps
9” zipper
General quilting and sewing supplies


Cutting:
Note: I used a Pellon 809 interfacing for both the interior and exterior. I wanted my pouches stiff. Though, you don’t have to have it as stiff as mine. To soften the bag, only apply interfacing to the exterior fabric. It’s your choice. 
 
Interfacing
     4 – 8” x 11”


Exterior fabric (linen)
     1 – 8 1/2” x 11 1/2” (back)
     2 – 2 1/2” x 11 1/2” (front)
     2 – 1 1/2” x 4 1/2” (front)
     1 – 5” x 14 1/2” (optional strap)


Interior fabric and zipper end covers
     2 - 8 1/2” x 11 1/2” (interior)
     2 – 1 1/2” x 2 1/2” (zipper end covers)


Squares (block)
     36 – 1 1/2” x 1 1/2”

Sew with 1/4” seam allowance.
 
Make the Block:
Finishes 4” x 9”


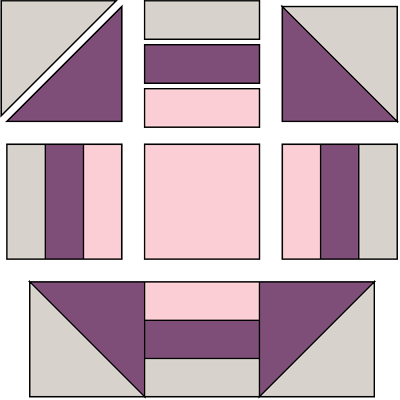
1.       Stitch together 9 squares across and 4 squares down.
2.       Stitch the small linen rectangle to each side.
3.       Finish the front exterior unit by sewing a large linen rectangle to the top and bottom. This measures 8 1/2” x 11 1/2”.
 
Make the Strap:
Choose to iron on fusible interfacing on the wrong side of the handle. I did for my Zipper Pouch Square-in-a-Square. However it was so stiff, I had to place the end next to each other, instead of on top of each other. For this pouch, I left the interfacing off and I like the soften feel of it.  Click here to see how to make a strap.


Prep the Zipper and Make the Bag:
1.      Refer to the Zipper Pouch Square-in-a-Square to prep to the zipper and make the bag.
2.      Iron on interfacing to front and back exterior, and front and back interior units. Center the interfacing to the wrong side of the fabrics. The interfacing is 1/4” short on all four sides. This is intended to reduce seam bulk.
3.    Feel free to machine quilt the exterior and interior units as desired.


Add the Zipper Tassel:
Click here to see how to make a zipper tassel for your pouch.
There you have it. There are other version of this bag to check out over on my blog. Now that you have all the ingredients to make your very own pouch, it’s your turn to make it blossom.

Enjoy!
Sandra

Monday, March 7, 2016

Book Review: Little Big Stuff by Michelle Jensen

www.mixiheart.com/

Friends,

Today I have something very special to share with you. I don’t do this often and I’m very conscientious of the content on this blog. However, Michelle Jensen is special to me. We met back at the 2014 Pittsburg Quilt Market. We happen to be in line for a book signing. After a shy hello, where you’re from and general questions about our businesses, we became instant friends. Then, my second quilt market was Houston 2016. And voila, we ran into each other. What are the chances? Although a year and a half had passed, we picked up our friendship like there was no time distance between us. Since, we support and encourage each other in this quilt industry, to grow our artistic roots, gain our fair share of revenues, and dream big.


Michelle wrote a book called Little Big Stuff: Pint-sized Play Sets to Sew for Kids. It is darling. It speaks so much to who she is as a person; sweet, kind, and happy. You know those people who seem to be all happy and smiling all the time, they never have a bad day, well, that’s Michelle.


This project book is sew fun and would inspire you to make things for little kids in your life. It is organized by type of play, for example, gardening, cooking, and camping. She uses fun fabrics with a modern flare in her project examples. These projects are perfect for your home. I particularly enjoy the baby section and have plans to make the diaper bag, sling, and blanket for my daughter’s baby toy. The tent is amazing for those bad weather days when you just know that museum is crazy packed with people. I can’t wait to make one for my little girl, because every kid loves a small special place to play and read.

Little Big Stuff is a great project book for homemade gifts for your friends and family. Go and check it out.
Sandra


Sunday, March 6, 2016

Tutorial Zipper Pouch Lace


Hello. To celebrate my new book, Scrap Patchwork, I've put together a series of zipper pouches. 

But first, let put my own plug on this wonderful book. It’s a DIY book on making organized scrappy quilts. I talk about color and organizing your stash. You’ve gotta check it out. Most of the quilt patterns comes with alternate layouts and sizes, providing you with more possibilities. You’re going to love it.

https://www.etsy.com/listing/267884263/scrap-patchwork-book?ref=shop_home_active_3

Finished Size 8” x 11”

Materials:
1/2 yard of interfacing
Fat quarter of exterior
Fat quarter of interior, straps, and zipper end covers
Fat quarter of lace
9” zipper
General quilting and sewing supplies


Cutting:
Note: I used a Pellon 809 interfacing for both the interior and exterior. I wanted my pouches stiff. Though, you don’t have to have it as stiff as mine. To soften the bag, only apply interfacing to the exterior fabric. It’s your choice.

Interfacing
     4 – 8” x 11”

Exterior fabric
     2 – 8 1/2” x 11 1/2”

Interior fabric, strap, and zipper end covers
     2 – 8 1/2” x 11 1/2”
     1 – 2” x 14 1/2” (optional strap)
     2 – 1 1/2” x 2 1/2” (zipper end covers)

Lace
     2 – 8 1/2” x 11 1/2”

Sew with 1/4” seam allowance.

Make the Strap:
Choose to iron on fusible interfacing on the wrong side of the handle. I did for my Zipper Pouch Square-in-a-Square. However it was so stiff, I had to place the end next to each other, instead of on top of each other. For this pouch, I left the interfacing off and I like the soften feel of it.  Click here to see how to make a strap.


Prep the Zipper and Make the Bag:
1.   Refer to the Zipper Pouch Square-in-a-Square to prep to the zipper.
2.     Iron on interfacing to front and back exterior, and front and back interior units. Center the interfacing to the wrong side of the fabrics. The interfacing is 1/4” short on all four sides. This is intended to reduce seam bulk.
3.     Place the lace on top of the right side of the exterior fabric. Secure it in place by stitching  it with a 1/8” seam allowance.
4.     Refer to the Zipper Pouch Square-in-a-Square to make the pouch.


Add the Zipper Tassel:
Click here to see how to make a zipper tassel for your pouch.
 
There you have it. There are other version of this bag to check out over on my blog. Now that you have all the ingredients to make your very own pouch, it’s your turn to make it blossom.

Enjoy!
Sandra

Thursday, March 3, 2016

McCall's Quick Quilt - April/May 2016 Quilt Feature


Hello Friends,
 
My very first magazine cover on McCall's Quick Quilt, April/May 2016 issue. I'm so thrilled.
 
 
This quilt is o so easy. It's large half square triangles and bunch of sashing. You could totally make this uber modern by playing with bright colors and play with medium tones by separating them by warm and cool colors.
 
This couldn't have happened without the McCall's and my sponsors:
 
50wt Cotton Thread by Aurifil
Warm & White Batting by the Warm Company
Sashing and Border Fabric by Mochi Linen for Moda
Print Fabrics by Corey Yoder for Moda
White Bella Solid Fabric by Moda


If you're a subscriber, then you should have received your issue. The issue is on newsstands now.
 
While I have your attention, let me tell you about an awesome opportunity to purchase my book, Scrap Patchwork. I have my independent quilt pattern collection. If you love what you see here, you're going to love my book and patterns.
 
https://www.etsy.com/shop/makeitblossom?ref=hdr_shop_menu
 
 
Make it Blossom,
Sandra
 
 
Related Posts Plugin for WordPress, Blogger...